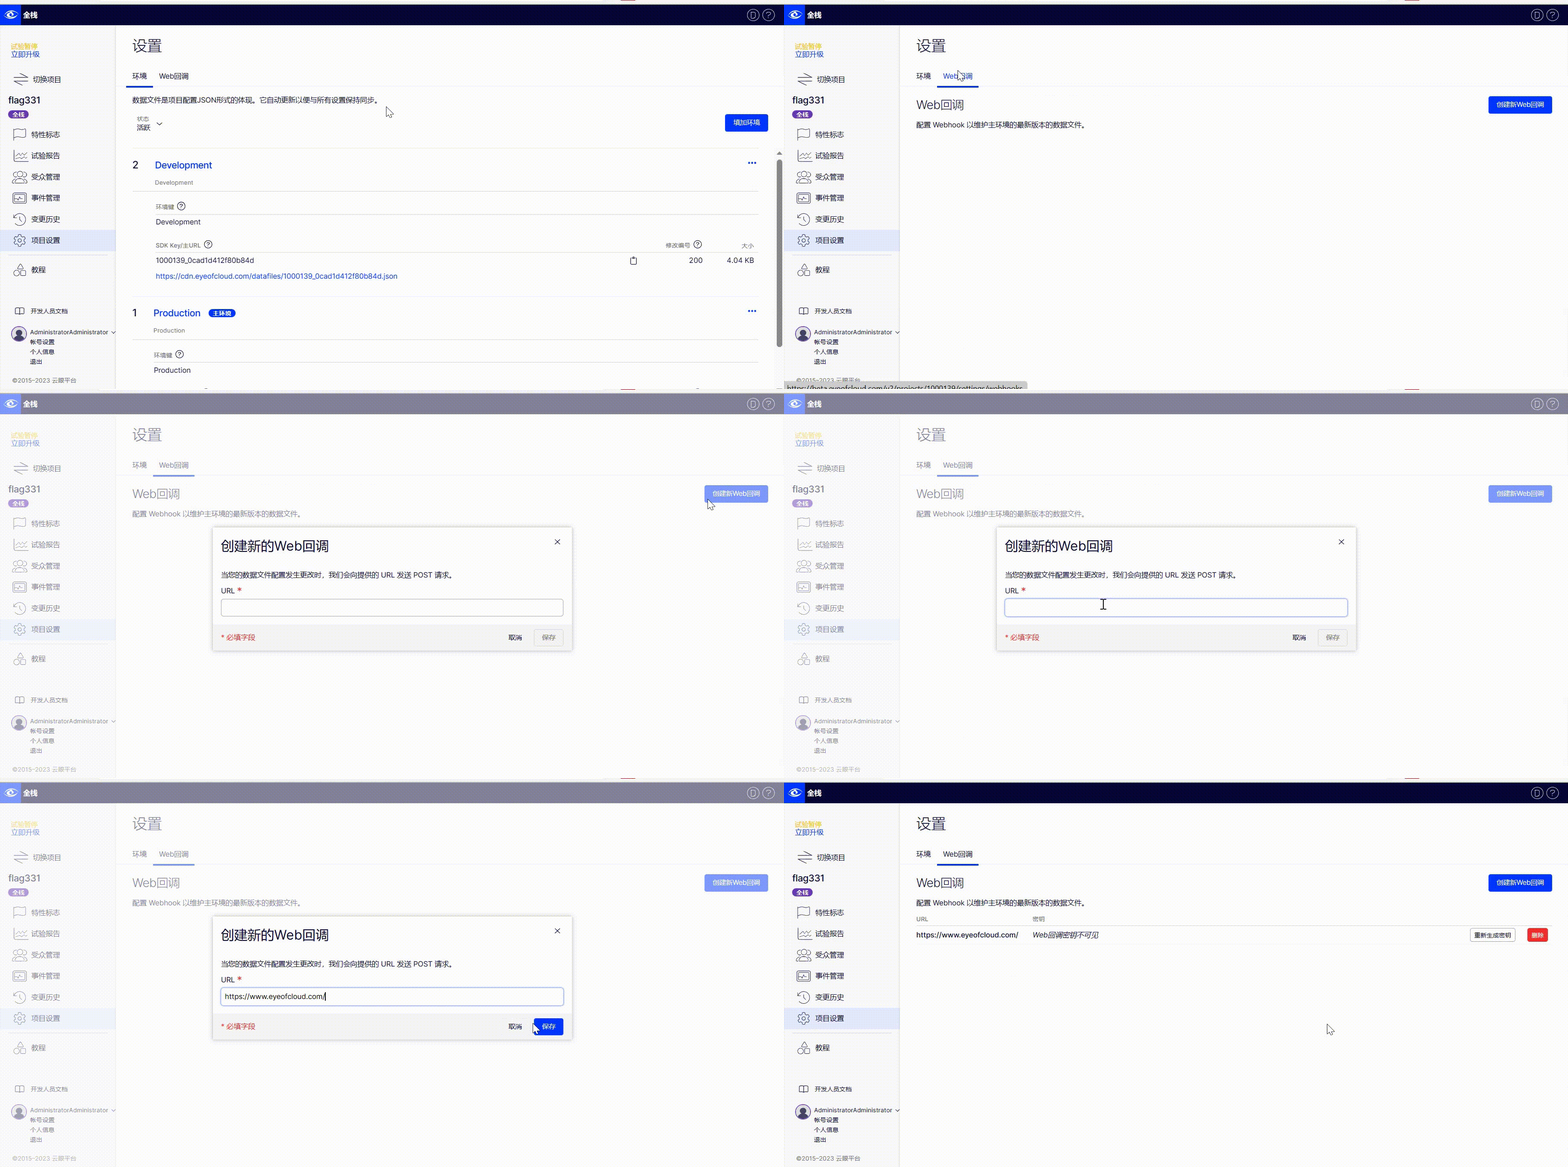
创建Web回调
创建Web回调
如何在云眼灰度标帜(Feature Flag)AB实验中创建Web回调。
若要在使用 云眼 功能实验时获得最大价值,你将希望在 云眼 UI 中对标帜规则所做的更改尽快在应用程序中生效。
执行此操作的一种方法是让应用程序轮询数据文件中的更改,其中包含有关实验的所有最新信息并标帜投放。但是,如果在具有服务器端组件的应用程序中使用 云眼,我们建议配置 Web回调。
🚧 重要
目前,云眼灰度标帜(Feature Flag)AB实验仅支持主环境的 Web回调。
云眼灰度标帜(Feature Flag)AB实验会在您在任何环境中进行更改时向提供的端点发送 POST 请求。
每当更改环境时,云眼灰度标帜(Feature Flag)AB实验都会更新每个环境数据文件的修订。
例如,如果有四个环境并更改其中一个环境,则会更新所有四个环境数据文件的修订变体。尽管仅在对主环境进行更改时触发 Web回调,但对任何环境的更改都会导致主环境的修订发生更改并触发 Web回调 通知。
通过使用 Web回调,云眼灰度标帜(Feature Flag)AB实验可以在数据文件更新时向服务器发送通知,无需不断轮询并确定云眼灰度标帜(Feature Flag)AB实验配置中是否有更改。收到 Web回调 并下载最新数据文件后,必须使用最新的数据文件重新实例化 云眼 功能实验客户端,以使更改尽快生效。
按照以下说明设置 Web回调 并测试其是否正常工作。
1. 在服务器上设置终端节点
设置 Web回调 的第一步是在服务器上设置公共 API 端点,该端点可以接受来自云眼灰度标帜(Feature Flag)AB实验的 POST 请求。
我们建议将终结点命名为/webhooks/eyeofcloud。但是,可以将终结点命名为所需的任何名称。
在服务器上设置公共终结点因所使用的语言和框架而异。下面的例子显示了使用 Express 的 Node (JavaScript) 和使用 Flask 的 Python。
Node
// Simple Node Express webhook example (see full example in step 3)
// Requires installing express: 'npm install --save express'
const express = require('express');
const app = express();

/**
 * 云眼 Webhook Route
 * Route to accept webhook notifications from 云眼
 **/
 app.use('/webhooks/eyeofcloud', (req, res, next) => {
    console.log(`
      [云眼] 云眼 webhook request received!
      The 云眼 datafile has been updated. Re-download
      the datafile and re-instantiate the 云眼 SDK
      for the changes to take effect
    `);
    res.send('Webhook Received');
});

app.get('/', (req, res) => res.send('云眼 Webhook Example'))

const HOST = process.env.HOST || '0.0.0.0';
const PORT = process.env.PORT || 8080;
app.listen(PORT, HOST);
console.log(`Example App Running on http://${HOST}:${PORT}`);
Python
# Simple Python Flask webhook example (see full example in step 3)
# Requires installing flask: 'pip install flask'
import os
from flask import Flask, request, abort

app = Flask(__name__)

# Route to accept webhook notifications from 云眼
@app.route('/webhooks/eyeofcloud', methods=['POST'])
def index():
   print("""
     [云眼] 云眼 webhook request received!
     The 云眼 datafile has been updated. Re-download
     the datafile and re-instantiate the 云眼 SDK
     for the changes to take effect
    """)
    return 'Webhook Received'

@app.route('/')
def hello_world():
    return '云眼 Webhook Example'

if __name__ == "__main__":
    host = os.getenv('HOST', '0.0.0.0')
    port = int(os.getenv('PORT', 3000))
    print('Example App unning on http://' + str(port) + ':' + str(host))
    app.run(host=host, port=port)
2. 在云眼灰度标帜(Feature Flag)AB实验中创建Web回调
在服务器上设置终结点后,记下在服务器上创建的终结点的完全限定 URL。如果服务器域>并且您按照步骤 1 中所述命名了终端节点,则完全限定 Web回调 URL >。在以下步骤中使用此 URL:<https://www.your-example-site.com``/webhooks/eyeofcloud``<https://www.your-example-site.com/webhooks/eyeofcloud
- 转到“设置”>“Web回调”。
- 单击创建新的Web回调...
- 输入云眼灰度标帜(Feature Flag)AB实验将发送数据文件更新通知的 URL(例如:
<https://www.your-example-site.com/webhooks/eyeofcloud>) - 单击保存。
- 记下为在下一步中保护 Webhook 而生成的密钥。

下面的示例显示了默认 云眼 主节点“生产”的 Web回调 有效负载结构 - 值可能不同。目前,我们支持一种事件类型:。environment``environment``project.datafile_updated
JSON
{
    "project_id": 1234,
    "timestamp": 1468447113,
    "event": "project.datafile_updated",
    "data": {
        "revision": 1,
        "origin_url": "https://eyeofcloud.s3.amazonaws.com/json/1234.json",
        "cdn_url": "https://cdn.eyeofcloud.com/json/1234.json",
        "environment": "Production"
    }
}
3. 保护Web回调
设置可以接受数据文件更新通知的公共终结点后,将需要保护 Web回调,以确保这些通知实际上来自 云眼 功能实验,而不是来自某个试图控制服务器灰度标帜(Feature Flag)配置的恶意用户。
创建 Web回调 时,云眼灰度标帜(Feature Flag)AB实验会生成一个机密令牌,用于创建 Web回调 有效负载的哈希签名。Web回调 请求在标头中包含此签名,该标头可用于验证源自云眼灰度标帜(Feature Flag)AB实验的请求。X-Hub-Signature
您只能在创建 Web回调 的密钥令牌后立即查看一次。如果忘记了 Web回调 的机密令牌,则必须**在“**设置> Webhook”页面上重新生成它。
标头包含 Web回调 有效负载的 SHA1 HMAC 十六进制摘要,使用 Web回调 的密钥令牌作为密钥并以 .验证此签名的方式因代码库的语言而异。下面的参考实现示例显示了使用 Express 的 Node (JavaScript) 和使用 Flask 的 Python。X-Hub-Signature``sha1=
这两个示例都假定 Web回调 密钥作为名为 的环境变量传递。 EYEOFCLOUD_WEBHOOK_SECRET
节点
// Simple Node Express webhook example (see full example in step 3)
// Requires installing express: 'npm install --save express body-parser'
const express = require('express');
const bodyParser = require('body-parser')
const crypto = require('crypto');
const app = express();
/**
 * 云眼 Webhook Route
 * Route to accept webhook notifications from 云眼
 **/
 app.use('/webhooks/eyeofcloud', bodyParser.text({ type: '*/*' }), (req, res, next) => {
    const WEBHOOK_SECRET = process.env.EYEOFCLOUD_WEBHOOK_SECRET
    const webhook_payload = req.body
    const hmac = crypto.createHmac('sha1', WEBHOOK_SECRET)
    const webhookDigest = hmac.update(webhook_payload).digest('hex')

    const computedSignature = `sha1=${webhookDigest}`
    const requestSignature = req.header('X-Hub-Signature')

    if (!crypto.timingSafeEqual(Buffer.from(computedSignature, 'utf8'), Buffer.from(requestSignature, 'utf8'))) {     console.log(`[云眼] Signatures did not match! Do not trust webhook request")`)
        res.status(500)
        return
    }

    console.log(`
        [云眼] 云眼 webhook request received!
        Signatures match! Webhook verified as coming from 云眼
        Download 云眼 datafile and re-instantiate the SDK Client
        For the latest changes to take affect
    `);
    res.sendStatus(200)
});

app.get('/', (req, res) => res.send('云眼 Webhook Example'))

const HOST = process.env.HOST || '0.0.0.0';
const PORT = process.env.PORT || 8080;
app.listen(PORT, HOST);
console.log(`Example App Running on http://${HOST}:${PORT}`);
Python
# Reference Flask implementation of secure webhooks
# Requires installing flask: 'pip install flask'
# Assumes webhook's secret is stored in the environment variable EYEOFCLOUD_WEBHOOK_SECRET
from hashlib import sha1
import hmac
import os

from flask import Flask, request, abort

app = Flask(__name__)

# Route to accept webhook notifications from 云眼
@app.route('/webhooks/eyeofcloud', methods=['POST'])
def index():
    request_signature = request.headers.get('X-Hub-Signature')
    webhook_secret = bytes(os.environ['EYEOFCLOUD_WEBHOOK_SECRET'], 'utf-8')
    webhook_payload = request.data
    digest = hmac.new(webhook_secret, msg=webhook_payload, digestmod=sha1).hexdigest()
    computed_signature = 'sha1=' + str(digest)

    if not hmac.compare_digest(computed_signature, request_signature):
        print("[云眼] Signatures did not match! Do not trust webhook request")
        abort(500)
        return

    print("""
        [云眼] 云眼 webhook request received!
        Signatures match! Webhook verified as coming from 云眼
        Download 云眼 datafile and re-instantiate the SDK Client
        For the latest changes to take affect
    """)
    return 'Secure Webhook Received'

 @app.route('/')
 def hello_world():
    return '云眼 Webhook Example'

if __name__ == "__main__":
    host = os.getenv('HOST', '0.0.0.0')
    port = int(os.getenv('PORT', 3000))
    print('Example App unning on http://' + str(port) + ':' + str(host))
    app.run(host=host, port=port)
📘 注意
请务必确保实现的所有 Web回调 机密令牌安全且私密。
❗️
警告
为防止时序分析攻击,在验证 Webhook 签名时,应使用恒定时间的字符串比较函数(如 Python 的
hmac.compare_digest),而非 == 运算符。
4. 测试实现
为了帮助确保安全 Web回调 实现正确,下面是可用于测试实现的示例值。这些测试值也用于 Runkit中正在运行的节点示例。
示例Web回调机密令牌
yIRFMTpsBcAKKRjJPCIykNo6EkNxJn_nq01-_r3S8i4示例Web回调请求有效负载
'{"timestamp": 1558138293, "project_id": 11387641093, "data": {"cdn_url": "https://cdn.eyeofcloud.com/datafiles/QMVJcUKEJZFg8pQ2jhAybK.json", "environment": "Production", "origin_url": "https://eyeofcloud.s3.amazonaws.com/datafiles/QMVJcUKEJZFg8pQ2jhAybK.json", "revision": 13}, "event": "project.datafile_updated"}'使用Web回调机密令牌和Web回调有效负载作为字符串,代码应生成 的计算签名,可以根据Web回调请求标头对其进行验证:sha1=b2493723c6ea6973fbda41573222c8ecb1c82666
示例Web回调请求标头
X-Hub-Signature: sha1=b2493723c6ea6973fbda41573222c8ecb1c82666
Content-Type: application/json
User-Agent: AppEngine-Google; (+http://code.google.com/appengine; appid: s~eyeofcloud-hrd)
🚧 重要
使用请求垃圾箱等工具来测试Web回调。请求箱允许创建Web回调URL 来处理 HTTP 请求并以人类可读的格式呈现数据。单击请求箱站点上的创建请求箱,并使用生成的 URL 作为终端节点 URL 进行测试。